12/17, for Dingbat
I saw Irene Posch's 1-Bit Textile and Kobakant's Flip-Dot swatch and wanted to have a play with the idea. And it was Christmas, and there were steampunks to adorn.
Solderable enamelled copper wire for coil winding. I used 0.31mm for this, which is fatter than we need. We tried 0.224mm in a later workshop, and that was fine. I got my supplies from the Scientific Wire Company (who have many excellent wires)

I wound by hand, not very tidily, onto a 13mm former


Soldered on connecting wires. You need a hot iron to solder through the insulation. 150 turns gave me about 2.5 ohms.

Lacing, for protection and to tidy up the shape.


Sewn-in pivot thread, and a 10mm magnetite bead from eBay. These are sold in magnetised and non-magnetised flavours, get the magnetised one! They always seem to have the axis of magnetisation at right angles to the hole, which is what we need for this. A slightly bigger former would probably have been a good idea so the bead sat a bit further down.
The masking tape is so I can see it flip. It needs at least 200mA, maybe more to be reliable

Eye is a bit of white gloss spray paint, with blue and black Sharpie. My first attempt, with Tipp-Ex instead of paint, worked less well because of lumpiness.

Driver is a Digispark ATTiny85 board and an L293DNE dual--H-bridge driver, with the two bridges wired in parallel. It sees about 3V when driven, and what must be around 1A. Still gets stuck occasionally, though, so the software implements a bit of jiggling.
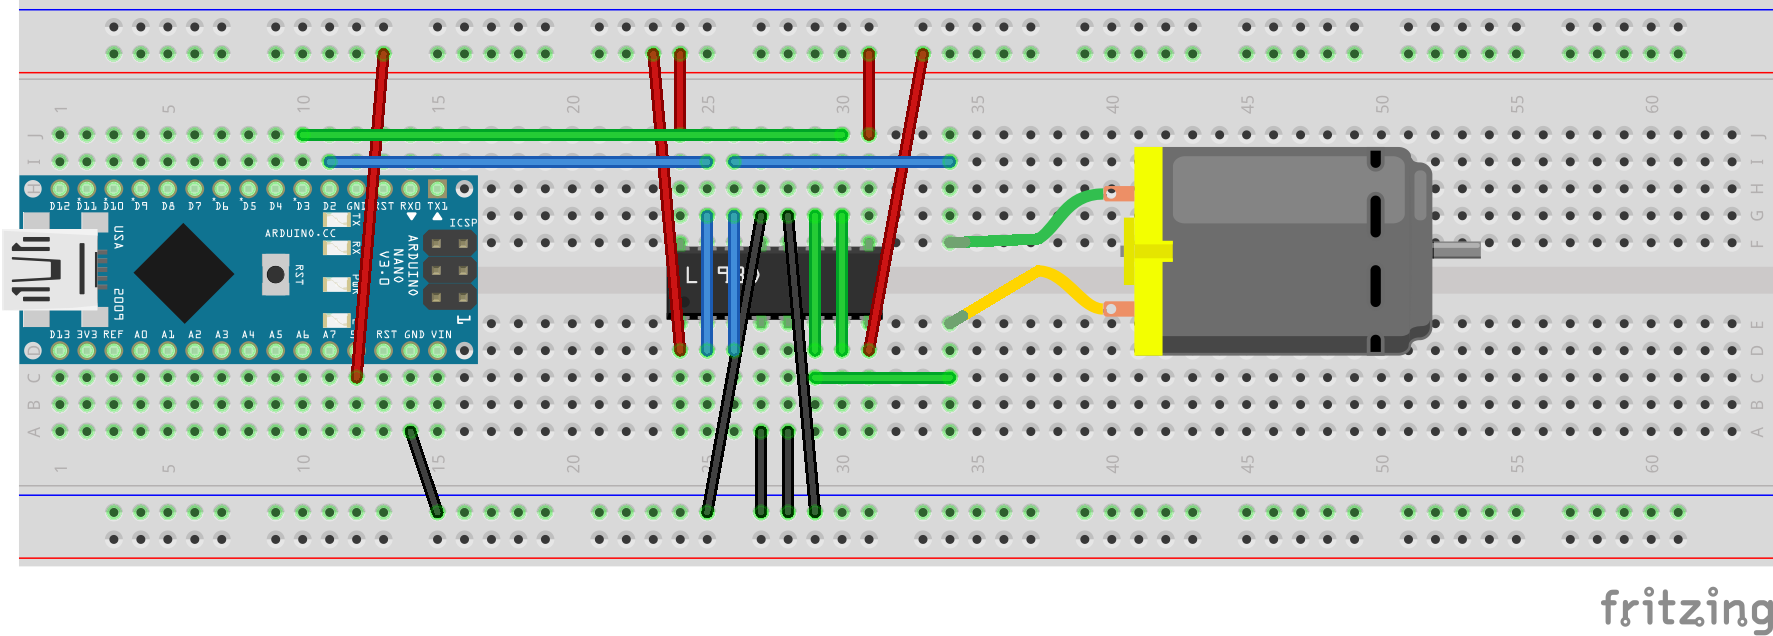
If you want to do this on an Arduino Nano, you need slightly different pin numbering. Use this code and this wiring (with your coil in place of the motor):

Here's the Fritzing file
The brooch was a charity-shop find, originally very bright and brassy, looked much better after a quick visit to a blowtorch.

 Home | Artefacts| Robots